The idea behind this card is a set of double arches, like McDonald's, upon which content is glued, in this case a flutter of butterflies. The arches lift upward when the card is opened. In front of the arches will be a figure. The figure can be attached to the arches and operate in harmony as a single unit or it can be a separate mechanism working either in harmony or in opposition to the arches. The choice is stylistic. 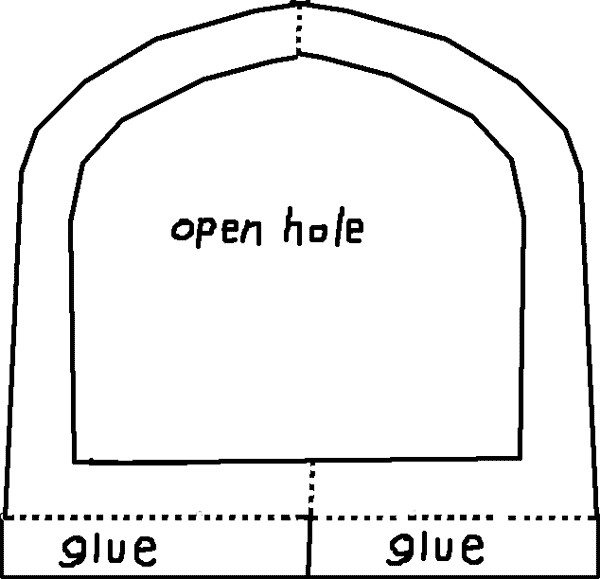 The arch is made by folding a page of card stock in half and cutting half an arch. This ensures the opposite side is a mirror of the first. It is not necessary for the two sides of the arch to mirror, it just makes it easier to make and to show. Asymmetry is actually a lot more interesting visually, but lets just pretend for now, okay? This is the basic idea. If the tabs are glued bent forward from the arch they will separate in opposite directions toward the corners of the front of the card. If the tabs are bent backward behind the arches they will overlap at the center fold. In that case, the tabs must be nicked to prevent them from overlapping at the crease. One side can be bent forward and the other side backward for added structural strength. The tabs can be cut into segments with some segments glued forward and other segments glued backward, it's entirely up to you and your whim. The "V" shape of which I speak is the strip that comprises the base of the arch and its tabs that connect it to the card. It is the workhorse of many of these mechanisms. Because the folded strip is attached to both sides of the card, it does things when the card is opened and closed. Marvelous things. The "V" can be a skinny "V" or it can be a fat "V". It can be a lopsided "V". It can be tall on one side and short on the other. It can be long and tall and full of stuff on one side and short and narrow and empty on the other side of the "V" but it must, it MUST, be mirrored angle on both sides of the central fold. It can be almost a completely flattened "V" but that would have nearly zero structural integrity and would be most unreliable in folding and opening properly. It's content would flop hopelessly. It would tend to just smash instead of fold neatly like a hinge. If it were a tight narrow "V" it would be almost like a tough structural pillar that goes boing when the card is opened. You could attach nearly anything to it and it would flip right up. So there are obvious trade offs with this widening out and narrowing up of the "V" that is formed by the base of any given arch. Too narrow, and it's hardly an arch at all that gets formed, it would come to a point at the top and as it peaked it would also arch forward like a canopy. Maybe you want that. I want a rainbow, not a canopy so I will widen out this "V" as much as possible without sacrificing too much integrity. I'm going for a rainbow shape but this will be a sort of canopy rainbow. There will in fact be two such canopy rainbows. Any "V" shape that is formed on a card by gluing the arch pictured above will result in an arch that stands straight up and folds flat at a 45° angle and that aims toward the corner of the card when the card is folded closed. Although this is mathematically pleasing, it is unreliable in the real world of pop-uppery because cards are actually seldom opened completely which is required to achieve the upright position. Straight up-ness tends to be wobbly anyway, especially when spans of paper are loaded with content. The paper tends not to stand straight up because paper itself is wobbly and unstable when standing even when shaped as a "V". That situation is corrected by trimming the perpendicularity slightly, so that when the card is opened 95% or so, as one does when viewing a greeting card, the mechanism will lift to its desired position or near it. This can be taken to an extreme so that the uplifted portion is angled so harshly that it lifts up and outward resting flatly right off the page veritably doubling the distance of the upper edge of the page. Awesome, if that is what your are going for. But not here. Now we want the arch to support butterflies as if fluttering upward from the open flattened surface of the pages, not just beyond the upper edge of the card, if you see a difference there. Outward from the edges of the card we really don't care about right now, we want an upward fluttering movement. When these arches are raised they are strengthened by their V shaped base and by its slightly backward tilt. Therefore, consider cutting the arch to fit the backing at an angle to compensate for floppiness and to strengthen the finished structure which, being paper, tends to bend once it is loaded up with content, even content so light as butterflies. Like this: 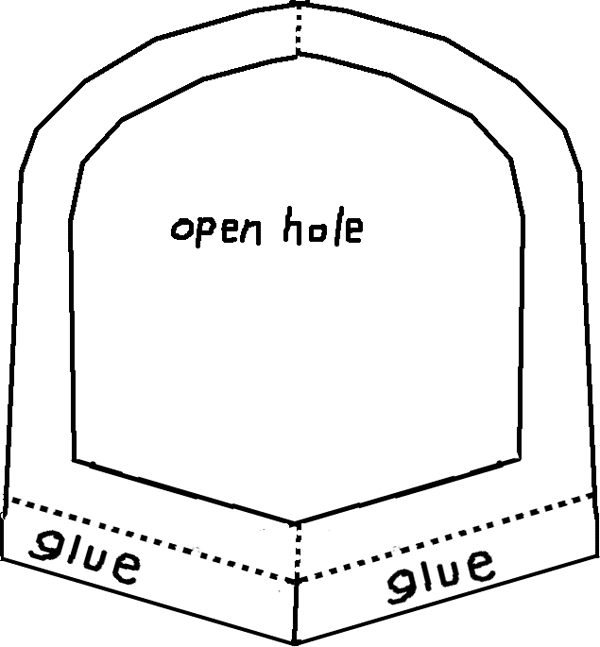 Revised arch. Now, no matter what type of "V" arch you glue, narrow or wide, your arch will lean either toward the viewer or away from the viewer. You could not get this arch to stand straight up if you wanted to, which you don't. It's going to tilt backward. The above arch is drawn with a severe angle. Its tilt then would be quite severe. I've drawn it this way for example only. Do not use this sketch for a template. In actuality, your angle would be much less than shown above, a mere fraction of an inch off from perpendicular. Determine if you want the arch to tilt forward or tilt backward, in this case backward. Determine where on the page crossing the central fold the "V" shape must be positioned in order for it to fit when the card is closed. Make sure the arch does not stick out when the card is closed. If the arch does stick out, then make adjustment now. If a small part of the tab sticks out beyond the card's boundaries, that's okay, if the tabs must be positioned at the extreme edge of the card then the tabs can be trimmed a little with no serious ill effect. Create the arch from a folded piece of card stock thus: 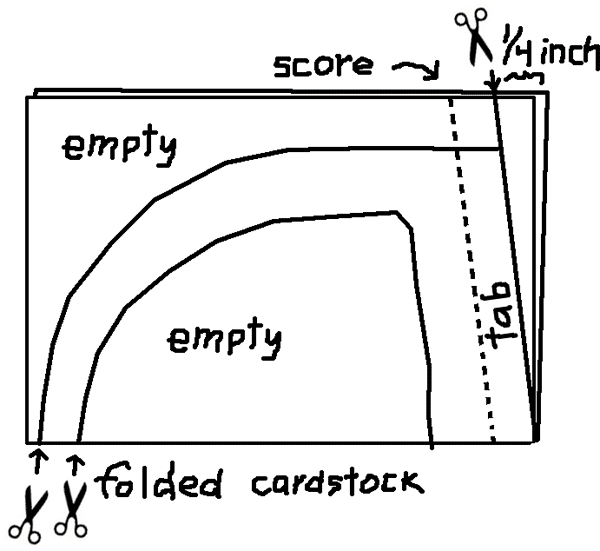 So that you end up with this: You're basically creating a new edge, a angle under the word "tab." By realigning the whole arch along the grid of your work surface you can figure the new angle for the score of the fold that determines the width of the tab and the new angle for the base of the arch. These two things, the new angle for the tab and the base of the arch constitute a properly angled "V" mechanism. The arch is content that is attached to that mechanism, here all cut out in one piece. Hint: If you were to create a bunch of "V" mechanisms to get them out of the way for use later, then the scores and cut lines would appear as a chevron covering the unfolded page. It's super neato-mosquito to make a card this way. Whenever a need for a new "V" arises, just grab a prefab "V" from your little pile of "V" mechanisms all ready to go. Just cut them to suit your immediate need. They would all be set at this established angle. Be mindful that this arch can be anything. With extra upright portions and more cutouts it could be a group of trees. By layering these arches and varying the cutout portions, you can create a layered forest. You can vary the angle of the two "Vs" formed by double arches and connect them at the top and suspend nearly anything, say, a bell. This arch idea can be re-visualized infinitely and repurposed to surprising effect. Understand that what makes it all work is the "V" with its tabs that cross the central fold of the card. Everything devolves from the original "V" shape set across the central fold and itself cut into a very slight "V" that is not quite perfectly perpendicular to its own central fold. You can see that if the new angle of the tab were cut in the opposite way then the opposite thing will happen. The elevated portion of the "V" mechanism, and therefore the arch, will fold opposite to how it does here, and you don't want that right now. But do keep all that in mind because for another card some day that might be just the thing you will want. 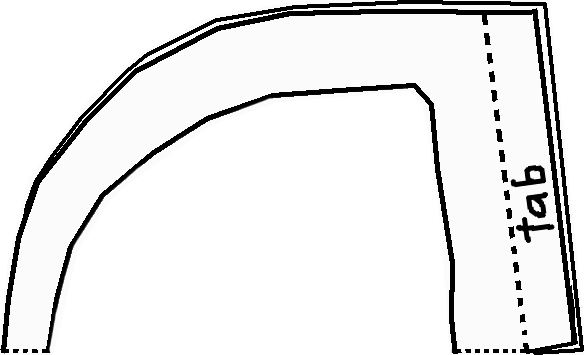 You can actually cut two of these arches at the same time (four layers of card stock), or use the first folded arch as a template for the second arch so that both finished arches are exactly the same. As you go, you will see that the arches need not be exactly the same, nor must they be exactly mirrored on both sides. Although both sides of the "V" must be glued at mirrored angles. It's just that's it's easier right now to make both arches this way and to conceptualize what is happening when they are close to the same as possible. Later, you will see that making them different sizes has many advantages. In fact, they need not be arches at all, they can be pillars, or they can be nothing at all like arches and pillars, they can be any content you wish because the success of the mechanism lies in the "V" that crosses the central fold, not the arch shape. The "Vs" at the bottom, which are basically folded strips, can support pillars that in turn support another attached flat surface that work parallel to and in tandem with the base of the card, as if the pillars elevate another plane parallel with the fully opened card that is forced to fold precisely as the whole card folds. These pillars can present the new surfaces forward toward the viewer or the pillars can lift up and lay back the new elevated surface. Both movements are quite dramatic indeed. These new surfaces that operate parallel to and in tandem with the background of the card that are elevated by pillars which in turn are supported by "V" mechanisms, can themselves be topped with additional content. Crazy, eh? these new surfaces can even be stacked, again, all working both parallel to the background of the card or in opposition to it, like a tent upon an elevated surface, the back to a bug, a canopy to a jet plane, etc. All these possible new surfaces are either attached by glued tabs or by tabs that fit through slots. The tabs with slots allow slightly more freedom as more and more content becomes elaborated it's usually good to have a little give. Glued tabs are more strict in how they force movement in attachments So, when you need a little more freedom or give, then the slotted tabs are preferred over glued tabs. But right now we are gluing new surfaces because we're being strict about movement and firm about tightly controlled structural integrity. Our new surfaces here that will be elevated by the arches and that will operate on planes parallel with the background of the card, and that will contribute structural integrity to the pillars, will all be butterflies, and nothing but butterflies. Here is the card back showing its central fold: 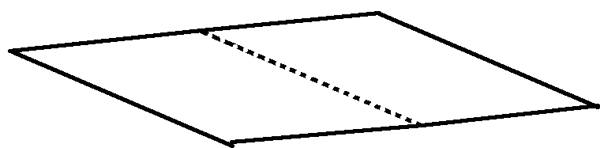 Here i the same card back with one arch glued onto it at the back of the card and leaning backward slightly. This is one of the arches that will hold the butterflies.  The tabs are shown glued forward. They can just as easily be glued backward. If the tabs were cut with a constant 1/2 inch width, then they could be used to space the two arches apart from each other by exactly 1/2 inch without any further measuring or fussing about parallel placement of the second arch onto the page. This point I want to stress. After fiddling around with the unglued arch trying to determine its best placement across the central fold, and its distance from the edge, holding it there with your fingertips and gently closing the card, checking the fit, and finally determining how broad of a "V" you want to cross the fold. Then boldly glue one single tab backward toward the near edge of the card, not forward as shown. Having done that one, all the other positions for glued tabs are now determined. The second half of that first "V" mechanism with its arch is glued by closing the card over a wet glue tab that was pre-collapsed in the closed position to accept its placement on the opposite side of the central fold. When the card is opened again voila! Both tabs are positioned perfectly and by opening the card, the "V" mechanism, arch and all, is forced upward from its tucked position into its full open upright splayed position so that the glued portion can obediently lay flat with the background of the card, which it must because it is glued. The second arch is determined by the position of the first arch which is now fixed so it is even easier. The tabs of the first are glued backward and they are exactly 1/2 inch wide. Therefore by lining up the second arch with edge of the glued backward-facing tab of the fist, the position of the second arch is automatically determined with no measurement necessary. The arches will be exactly 1/2 inch apart along its entire length. The position of the fourth tab is determined likewise by the edge of the preexisting first arch's tab. If those first tabs were glued forward, do not despair, just measure with a ruler to keep the "Vs" and the arches parallel. I'm showing the tabs up there glued forward for demonstration of tabs VS uprights VS background only. In fact, they were glued backward and used as spacers. Because those tabs in reality aim backwards and not forward as shown above, they overlapped over the central fold, so the tabs were nicked where they overlapped, removing that small portion of troublesome tab, which left slightly less surface for glue. Had I not felt rushed, maybe it was the coffee, I could have hidden the tabs entirely by cutting slots for them right through the background as I often do and then gluing the tabs to the underside of the card. In that case, a whole new cover must be provided, glued on the outer surface to cover all those messy tabs that are glued under there. As it turns out this card did have a such a cover page and a new back, a stiffer form of matt board, but at this point of construction it was not certain that kind of cover would be provided, so I did not want those tabs showing on the outer surfaces and therefor did not cut slots for the tabs. Plus I was lazy. Either way is perfectly fine. Nobody really cares about seeing unsightly tabs anyway. The slots with concealed tabs method is more refined and more precise and more professional than the method of gluing tabs directly onto the top surface, and concealed tabs are mysterious for the viewer who might not have a clue how these things operate, and all that mystery created by tabs that disappear through neatly cut slots is more confounding and delightful especially for children who tend to marvel at the ingenuity of things that seem like magic. Children like me. But there are two arches. 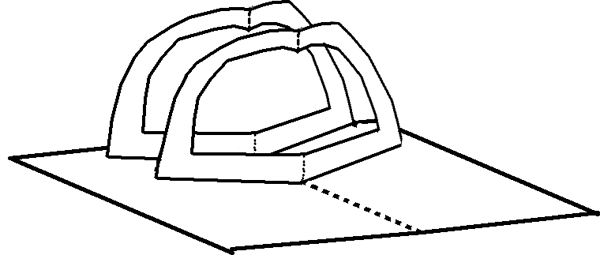 Obviously, the arches are closer together than shown here and nearer to the back than to the center of the card. It's a clumsy drawing, but I'm just trying to show. The farther back the arches are, the taller they can be when they fold forward when closed as these do. If you get this far and discover your glued-on arches are too tall to fit inside the folded card, you can just cut them off at the knees and glue them back together so that they fit. Then cover the correction with content and no one will ever know the difference. Horizontal reinforcement provides both both structural integrity and additional surface for more content. The idea is to slice through the upright content with new surfaces that are held in place with tabs. That takes a bit of precision measurement and some tricky cutting and fitting. My dumb fingers are a bit too clumsy for delicate precision work. Here is a rather oafish trick that eases the addition of horizontal reinforcements and provides surfaces albeit with more paper than necessary and not at all refined. You can certainly see what is going on here and then improve on the idea since you are undoubtedly more graceful than I am. If the tabs for the arches were cut at 1/2 inch width, and if those tabs were used as spacers, then this can all go with almost no measuring at all. Create a square tube from card stock. If you are working on a padded surface with a grid, then use the grid for the measurement of scores into the card stock instead of making ticks from a ruler. Either follow the grid lines on the pad or measure 1/2 inch increments on either the width or the length of card stock, then score with an extra length for overlap, thus, 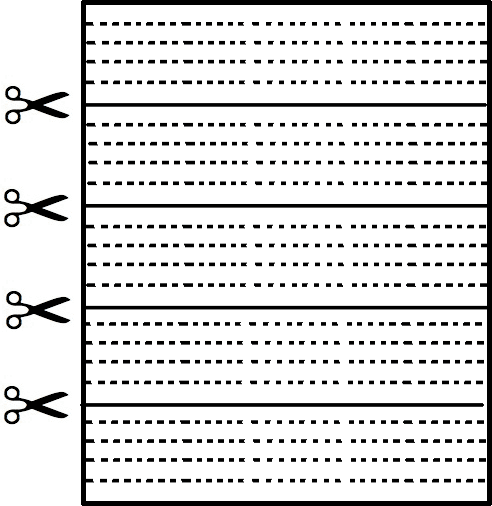
Glue one edge to create these:
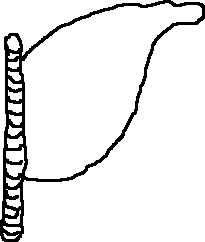
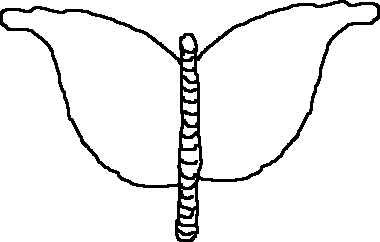
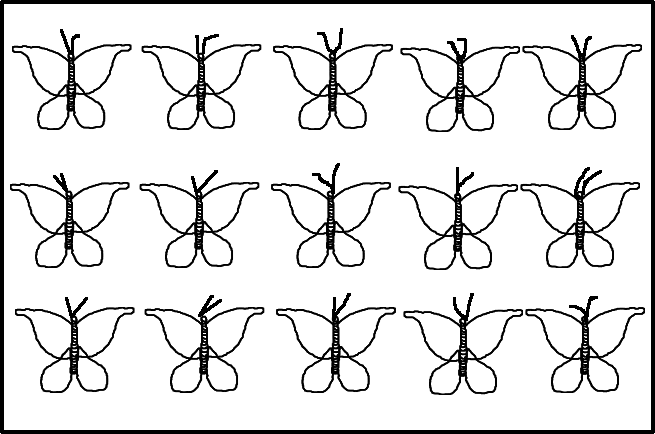
 Again, obviously this image is intended to convey the idea of scoring four lengths and cutting along the fifth length. Your sheet of card stock will look a little different from this. Whether you score along the width of the paper or the length of the paper, this does convey the idea that several square tubes can be created at once that can then be cut to any desired length and used as reinforcing spacers, and by so doing, provide additional surfaces upon which new content can be attached. In the case of this card, butterflies were fitted through cuts made in upright butterflies and then glued to the top surfaces of these spacers. These spacers were fitted between the arches parallel to the fully opened card. Additional butterflies were attached to the tops of these spacer segments, also placed on the lower portion of the broad "V" mechanisms that held up the arches in places that were not otherwise covered with content. Thus the reinforcing spacer segments were concealed by butterflies. A separate spacer was attached to both the front of the arch and the top surface of the card. That spacer segment could accept a butterfly on either of the two exposed surfaces, the top or the front. I decided on an upright butterfly instead of a flat butterfly. Its only purpose was to bring a third layer to the two layers of archs. Had the arches been a forest then the attachment could have been a bush in front of the forest. Do you get the idea of embellishment here? One could keep on going indefinitely. Another spacer glued to the bush and glued to the surface of the card could than accept a bear in front of the bush in front of the forest. One is limited only by one's imagination. And I suppose by physics. And probably by paper mechanics. OK FINE! So there are limitations. The figure of a woman could also have been attached to one of these spacers , or to two of these spacers glued together to double the distance from the arches. It was decided instead for the figure to have her own separate "V" mechanism that operated parallel with the "V" mechanism of the butterfly arches. That was purely a stylistic choice. Your decisions may differ. Your decisions may even be better. In the case of this card, these square tubes were left over from a previous card so they didn't have to be fashioned anew for this card. That was possible because the spacing of the tabs is consistent from one card to the next. That is the result of my preference remaining consistent from one card to the next and not the result of any extraordinary prescient planning on my part. So, snips of these spacers are placed here and there at random, but always parallel with the background of the card no matter what angle the "V" of the arches is set. These spacers were glued right on top of the butterflies that were already glued on the arches, messing up my content and that made me sad, and they would have stuck out like sore thumbs had I not covered them with more butterflies and that made me happy again. Luckily, I made just exactly enough butterflies to suit my purpose. *buffs nails on shirt* No brag, just fact! 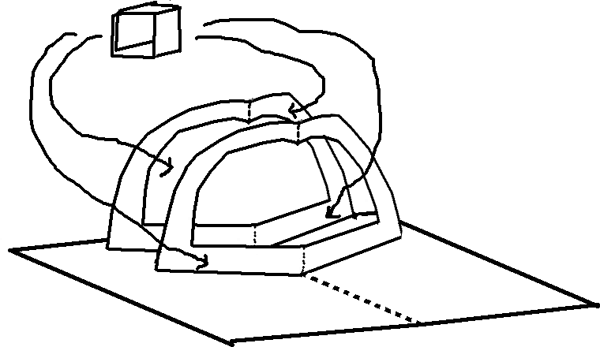 Okay, the following picture is very misleading. I'm attempting to show the spacers in place. The thing is, all the spacers are exactly 1/2 inch square, the original width of the scores that made them which happens to be the same width of the "V" mechanism tabs and the same distance between the two arches. Their length is usually smaller yet. Because I showed the arches far apart, it's just a drawing, that wrongly makes it appear as if the spacers are longer than they really are. The open ends of the spacers are the same as if the space between the arches were itself a tube. All the spacers do is connect the arches and provide extra horizontal surfaces, glue spots, upon which additional content can be attached on a plane parallel to the background of the card. That is, horizontal when the card is fully open as shown. That is the main concern here, to attach the spacers with their top and bottom surfaces horizontal to the opened card with their open ends aiming outward. That will ensure that everything collapses properly when the card is closed and doubly ensures everything is forced back into place when the card is reopened. You can attach these spacers and build surfaces to your heart's content as long as they are parallel to the surface of the background of the card. My picture is getting a little bit weird because it is not drafted properly, but I'm certain that you get the idea here. 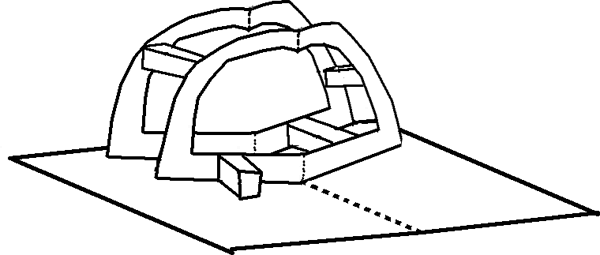 The spacers need not be tubes. It's just a lot easier for me this way. If you are so inclined, you can plan this out much better than this. It can be done mathematically and with great precision, but that's not the way I roll. This tube substitute is a slap-happy way to do somthing that is actually much more refined. You will understand once you see it work and realize how it can be much more refined by using less card stock and less glue. One last additional "V" mechanism for the upright to support the figure of a woman and I'm calling it quits with the diagrams here, which has gotten out of hand. Again, in actuality, the new "V" mechanism is placed farther to the back than shown here because I want the figure that is to be attached to it to have some height. I'm showing the mechanism, not its exact placement. 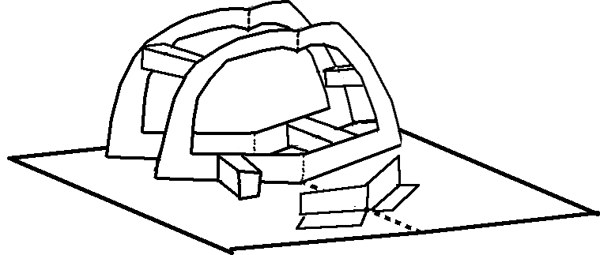 Four pages of butterflies were fired off as if they were hieroglyphics. Each page contained however many butterflies that would fit on the page following from the first butterfly drawn. Each butterfly on that page was speedily filled with color the same way it was scratched out. Zig-zagging across the page, wing to wing until the page was covered with color, then off to the next page, varying the bug slightly in wing shape and size and color but consistent as possible with scribbles on each page until the next page is filled. And so on for four pages and one pile of various butterflies. I did not count them. If I would need more I would draw another page, if I had extra, they'd be used otherwise or tossed. Brutal, in'nit? Here's how to draw a butterfly: Start with the bug. Then draw one of four wings. Draw the opposing wing. Draw the third wing, its stabilizer on the bottom. Draw the stabilizer's opposite. Try to get them to mirror. If they do not mirror exactly, don't worry, you can pretend you're looking at the bug at an angle. Add their antenna and fill them with color. It would be easier to paint these. I need to pick up an acrylic kit, I'm totally over water colors and pencils are a drag to cover large surface area like this. Vary the butterfly shapes. Show a little imagination like nature did. 

   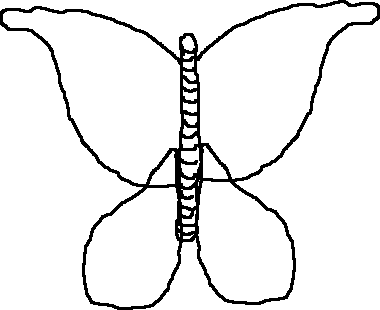  I don't know how to describe how to draw a figure of a woman, except to start lightly scribbling. Lightly scribble a little head and then scribble a little body. Scribble the legs then scribble the shoes. Scribble the arms then scribble the hands. Scribble and scribble until you start to see the shape you want. Within those scribbles are the lines you need. Darken those lines with more darker scribbles. You might realize the legs are too short so scribble new legs. That's how it goes. It's all a bunch of scribbling and nothing more than that. What? Careless, you say? FINE! Scribble a dog then, see if I care. I must mention that these arches are the idea behind the card pictured on the previous page but it is not how that card was produced. The arches of butterflies there were formed by the gluing the butterflies to themselves not to a preformed arch. There, the butterflies are the arches. That was more difficult and sloppier than the procedure described here, but it's the same idea. Along the way all kinds of other possibilities presented themselves but I stuck with the idea of arches of butterflies. I would have preferred for the stack to be taller and I do know of ways to do that but it would have complicated the project beyond the realm of a condolence card. Is this helpful to you? Please accept my apologies for making no templates available. I do not use them myself and I do think they would be stifling more than helpful. I do strongly recommend you try your hand at free-forming it and just go ahead and make mistakes. You'll have a lot more satisfaction with your own creation using your very own drawings. They'd have to be better than mine, no? I do think that part of the charm of my own cards comes from them being so stupid. Something polished wouldn't be nearly as amusing. I think. I'm not sure. |
Friday, July 25, 2014
butterfly pop-up card construction
Subscribe to:
Post Comments (Atom)
No comments:
Post a Comment